QuickStart Guide
This is a quick-start guide that will help you install Xi-CAM and explore an example plugin that you can experiment with.
This guide does not explore the implementation of the plugin in too much detail. For more in-depth documentation for developing plugins from scratch, see:
Install Xi-CAM
If you haven’t already installed Xi-CAM, follow the installation instructions for your operating system:
Overview
In this guide we will:
Explore the main window of Xi-CAM
Download and install an Example Plugin
Configure a sample catalog so we can load data
Explore the Example Plugin
Key Concepts
Here is a quick overview of some concepts that will be explored in this guide. Note that more documentation is available for each of these concepts.
We have one GUIPlugin (ExamplePlugin) -
this will be a plugin that you will be able to select and see within Xi-CAM.
The layout of the GUIPlugin is defined by a GUILayout.
We have a few OperationPlugins (invert and random_noise) -
These plugins are basically functions that take in data
and output derived data.
We also need a way to actually run data through the operations.
To do this, we have a Workflow (ExampleWorkflow) -
this contains linked operations to execute (can be thought of like a pipeline).
Looking at Xi-CAM’s Main Window
Let’s look at what the main window in Xi-CAM looks like first:
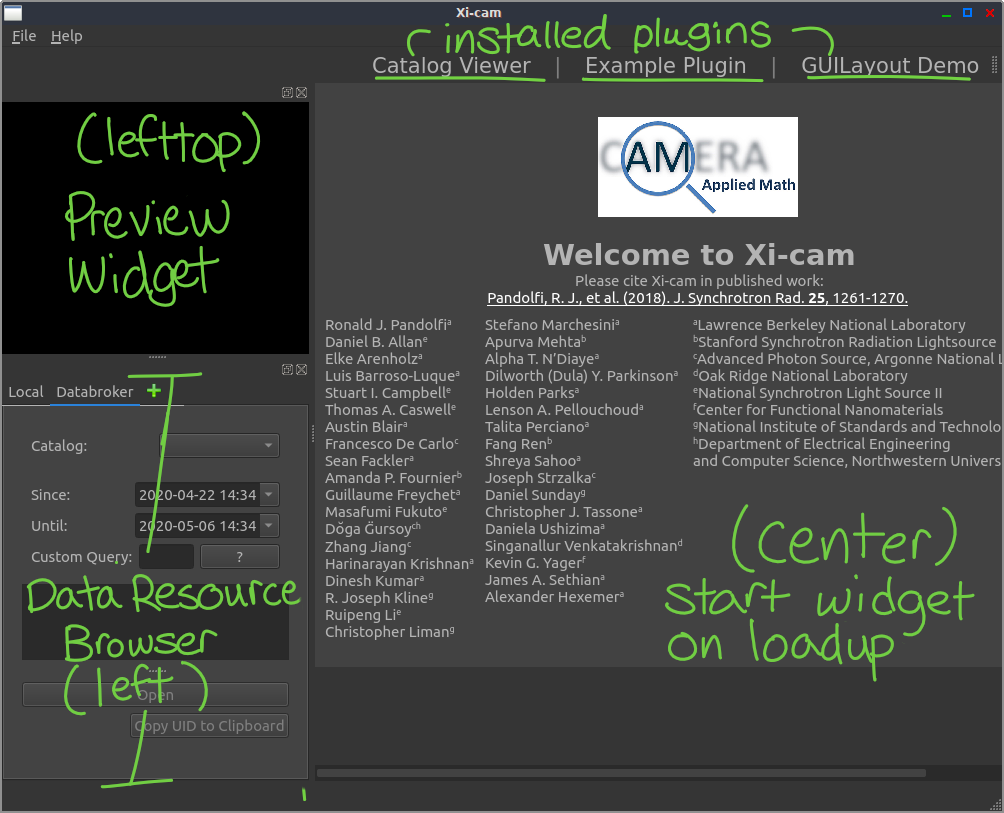
The main window of Xi-CAM after it has finished loading.
When Xi-CAM finishes loading, we see the window as shown above. Any installed GUIPlugins will be visible (and selectable) at the top (note that you will probably not have any installed yet).
We can also see some of the default widgets provided:
a welcome widget in the center of the window
a preview widget in the top-left (lefttop) of the window, which shows a sample of selected data in the data browser widget
a data browser widget on the left of the window, which can show available databroker catalogs
Quick GUILayout Overview
We mentioned the terms center, lefttop, and left above.
These correspond to positions in a GUILayout.
Here is a quick overview of how the Xi-CAM main window is organized:
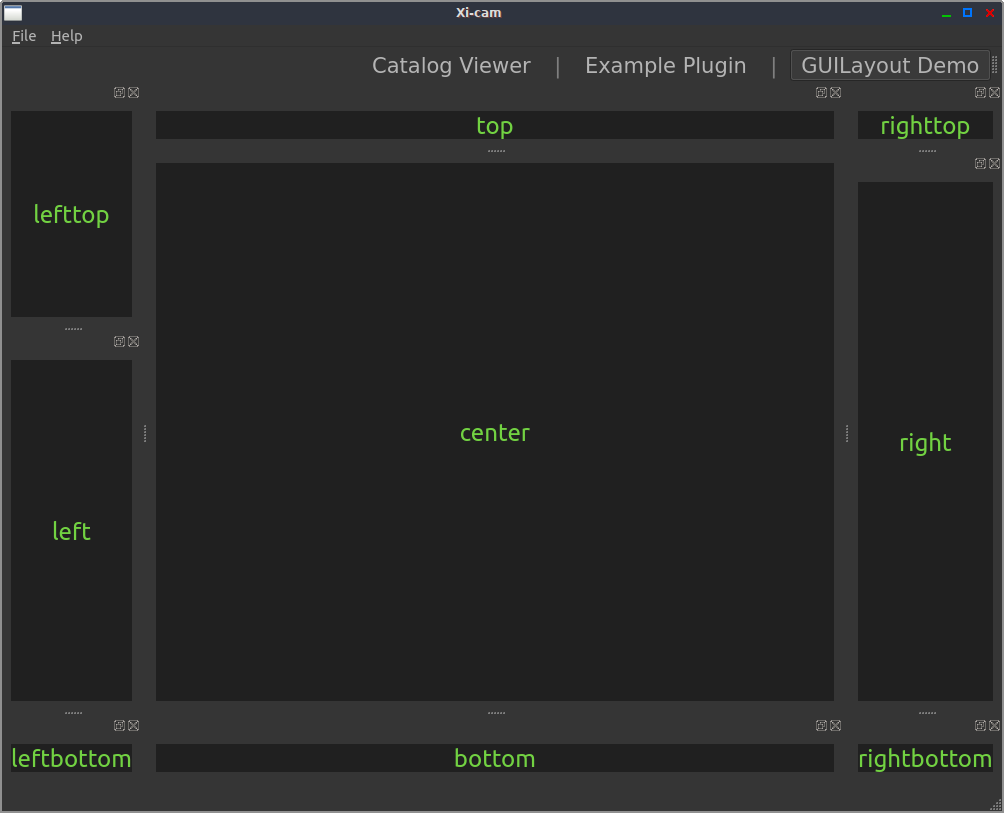
The layout of Xi-CAM’s main window.
You can see that the layout of Xi-CAM follows a 3x3 grid, where each section is named according to its orientation in relation to the center of the window.
(Note that any GUIPlugins you create will have one or more of these GUILayouts).
Download and Install the ExamplePlugin
Now that we have looked at the main window and its layout, let’s download the Example Plugin.
cd ~
git clone https://github.com/Xi-CAM/Xi-CAM.ExamplePlugin
cd Xi-CAM.ExamplePlugin
What’s Inside the ExamplePlugin Repository
The repository will contain the following:
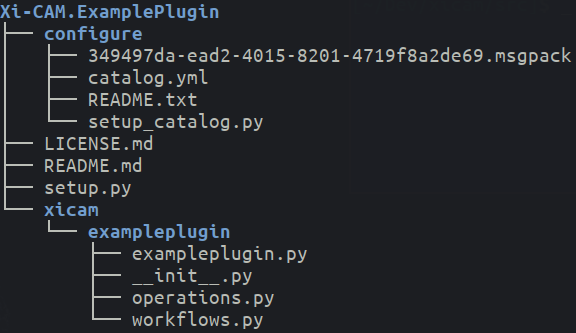
The contents of the ExamplePlugin repo when you clone it.
At the top there are a few files and directories:
setup.py- describes how to install this as a python package; also used to register plugins (via entry points).configure- special directory for this example, helps set up a catalogxicam- directory that acts as a python namespace package
In xicam, there is a exampleplugin subpackage that contains:
__init__.py- makesexampleplugina python package; also exposes theExamplePluginclassexampleplugin.py- module that contains theExamplePluginGUI pluginoperations.py- module that contains the exampleOperationPluginsworkflows.py- module that contains the exampleWorkflows
How Do I Install the Example Plugin?
So far, we have only downloaded the Example Plugin - we still need to install it so Xi-CAM can find it and load it.
We can install downloaded plugins using a pip editable install:
pip install -e .
This uses Python’s entry points mechanism to register plugins for Xi-CAM to see.
Exploring the Example Plugin Interface
When you run xicam,
you should now see the Example Plugin available at the top right of the main window.
Select it and you should the Example Plugin layout:
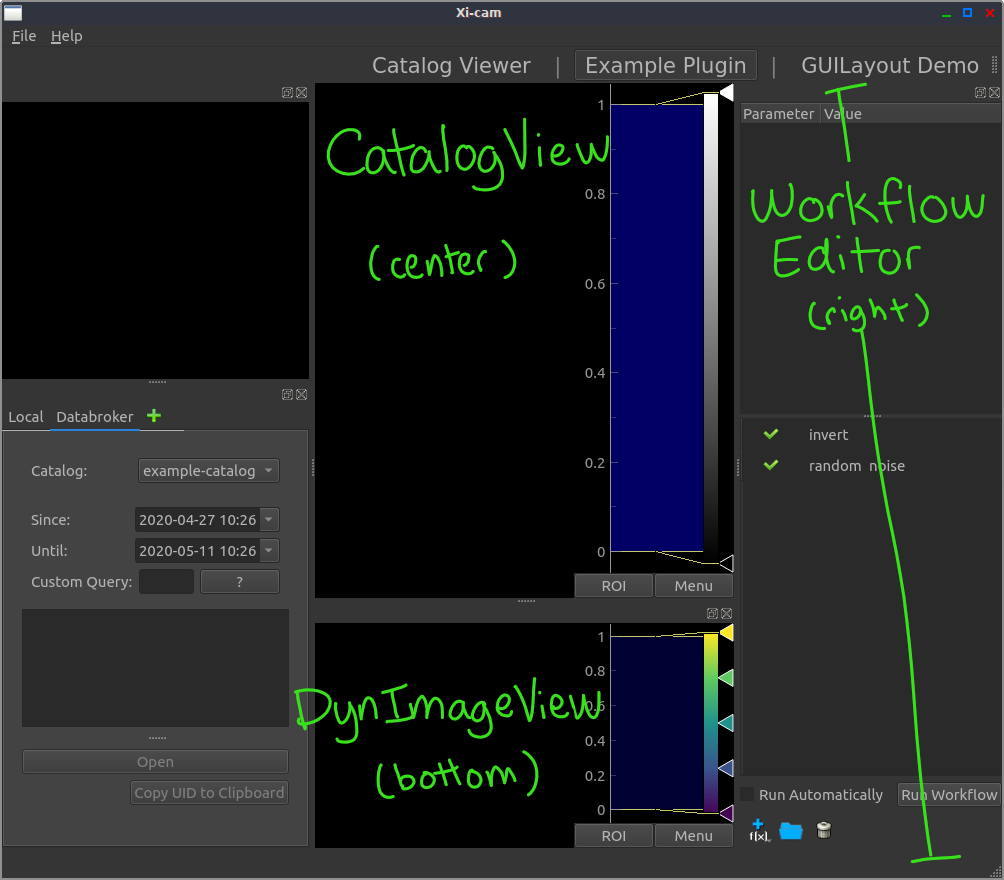
The Example Plugin. Uses a CatalogView, DynImageView, and WorkflowEditor as widgets in its layout.
In the center, we have a CatalogView that will be used to display loaded data.
On the right, there is a WorkflowEditor
that shows the operations in the workflow
and allows for running the workflow.
At the bottom, there is a DynImageView, which will be used to display the results data.
How Do I Load Data?
Now that we have the Example Plugin installed, we need to have data to load into it.
For purposes of this guide, we will be configuring a catalog called “example_catalog.”
For more information, see the Bluesky DataBroker documentation.
Configuring a Catalog
There is a configure/ directory in the repository we cloned.
This contains a catalog configuration file, a msgpack catalog, and a script.
Feel free to inspect the script before you run it; it will attempt to set up a msgpack catalog source for Xi-CAM to use:
cd configure
python setup_catalog.py
cd ..
Loading a Catalog from the Data Resource Browser
Now that we’ve configured the catalog, let’s make sure that Xi-CAM can see it.
When loading a catalog into Xi-CAM, you must have a GUIPlugin active. Let’s select our “Example Plugin.”
Look at the Data Resource Browser on the left hand side of the window. The Data Resource Browser gives us access to two different types of data browsers by default:
a bluesky browser for catalogs (adapted from work done by NSLS-II)
a local file browser
After configuring our example catalog, the bluesky catalog browser should have the text “example_catalog” in the Catalog drop-down box.
Notice that it also has two text inputs, Since and Until. Our example catalog was created in the beginning of 2020. In order to see the data (catalogs) our “example_catalog” contains, we need to change the Since text input.
Change it’s value to “2020-01-01”. This will now look for any data that was created since the start of 2020. After making this change, the example_catalog will be re-queried for data created within these new dates.
You should see a catalog show up in the table below with the id 349497da. If you single-click the row in the table to highlight it, more information and a preview of the data should be shown as well. You can then open it with the “Open” button.
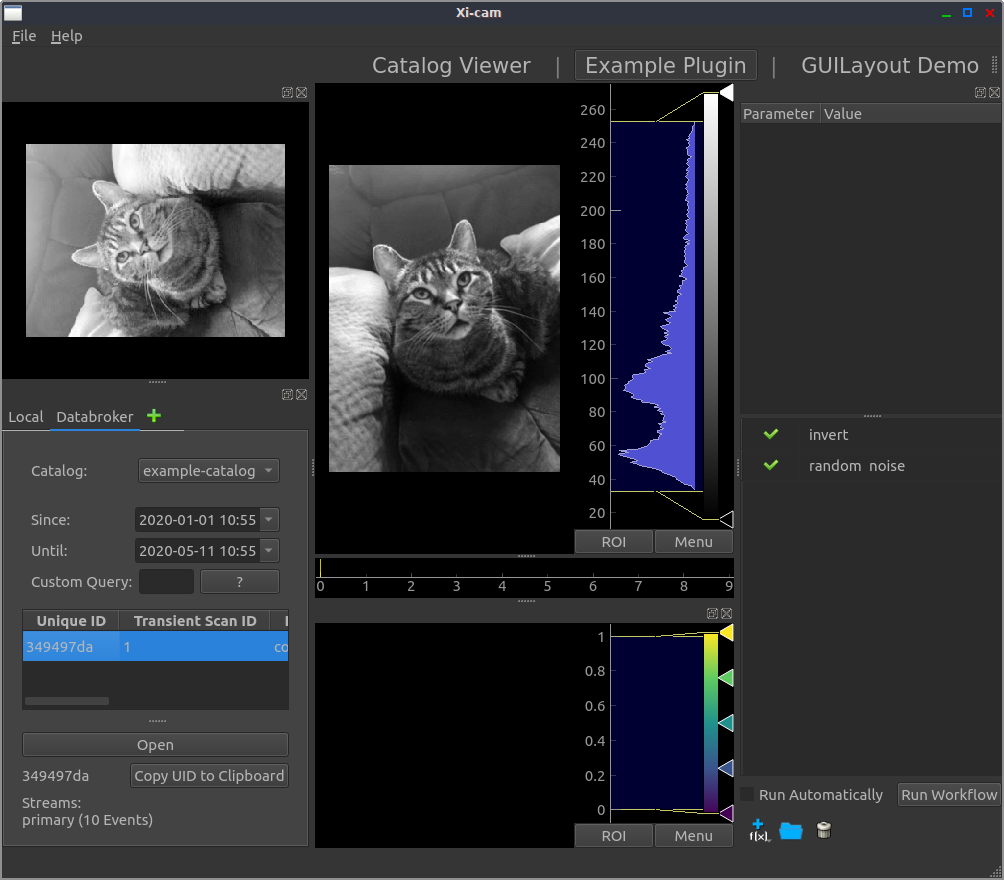
Here we see catalog 349497da in the DataResourceBrowser. It has one stream (primary) with 10 events in it. A preview shows the first frame of the data, and the opened data appears in the center.
You should see Clyde the cat loaded into the center CatalogView.
Running a Workflow
Our Example Plugin has one internal workflow, the ExampleWorkflow.
The ExampleWorkflow contains two OperationPlugins (operations):
invert- inverts its input imagerandom_noise- applies random noise to its input image, has a “strength” parameter to define how much noise to apply to the image
This workflow is exposed in the GUI with a WorkflowEditor on the right side of the layout.
Now that we have loaded some data, let’s run our workflow by clicking the “Run Workflow” button.
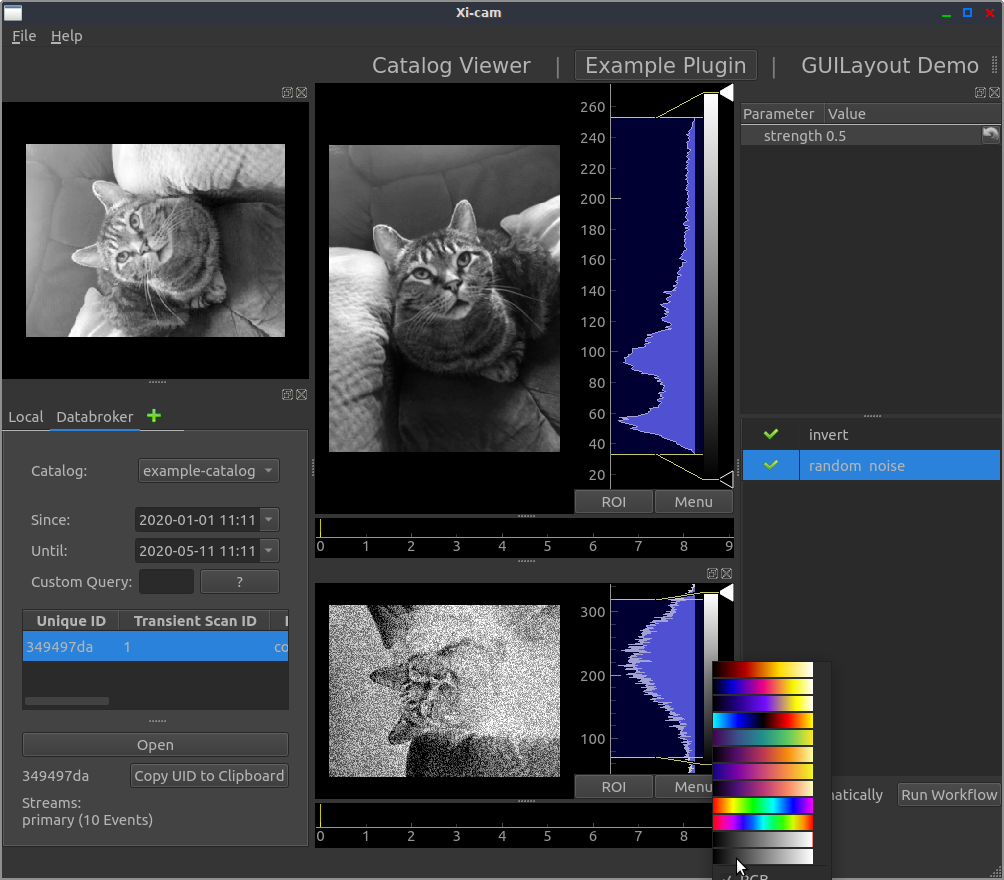
The result data after running the workflow. Note that the color lookup table can be changed by right-clicking the gradient bar.
You should see an inverted picture with some random noise added to it.
Note that you can adjust the amount of random noise
by selecting the “random_noise” text in the WorkkflowEditor,
then changing the value of “strength” that shows up in the parameter tree above.
Examining the Code
Let’s take a quick look at how the code is implemented for our Example Plugin.
The code for this particular plugin is organized into three modules:
exampleplugin.py- Defines theExamplePlugin(the GUIPlugin)operations.py- Defines twoOperationPlugins: invert and random_noiseworkflows.py- Defines anExampleWorkflowwith the invert and random_noise operations
operations.py
Here we define OperationPlugins (or operation)
An operation can be thought of as a function; input data is sent into the operation, and the operation generates some output with the given input.
When defining an OperationPlugin,
we use Python decorators (the @ seen in the code).
At the very least,
you must provide the @operation and @output_names decorators for an operation.
workflows.py
Here we define an ExampleWorkflow.
We add our two operations to the ExampleWorkflow,
then connect them so that invert’s “output_image” value is sent to random_noise’s input image argument.
exampleplugin.py
Here we define the gui plugin ExamplePlugin.
We provide a name for the plugin,
which will display as “Example Plugin” in Xi-CAM.
We define our widgets, our layout,
and any internal objects we might need (like the workflow) inside of our __init__ method.
We connect the WorkflowEditor’s sigRunWorkflow signal
to our run_workflow method.
This means whenever “Run Workflow” is clicked in the WorkflowEditor,
our ExamplePlugin’s run_workflow method will be called.
We also define a results_ready method
that will be called whenever our workflow has finished executing its operations.
Providing callback_slot=self.results_ready in our execute call
sets up this connection for us.