GUIPlugin Documentation
This documentation provides information on GUIPlugins and GUILayouts to help with designing your own plugins for Xi-CAM. API reference documentation is also included at the bottom.
If you are new to developing Xi-CAM plugins, it is recommended that you follow the quick-start documentation first.
For more general development resources, see the resources documentation.
What Is A GUIPlugin?
A GUIPlugin is an interactive user-facing plugin in Xi-CAM. It can be used to visualize and analyze data.
GUIPlugins make use of the qtpy Python package for interactive GUI components.
See the resources documentation for more information.
Where is GUIPlugin?
xicam.plugins.guiplugin
What Does a GUIPlugin Look Like?
First, let’s look at what Xi-CAM looks like when you first load it:
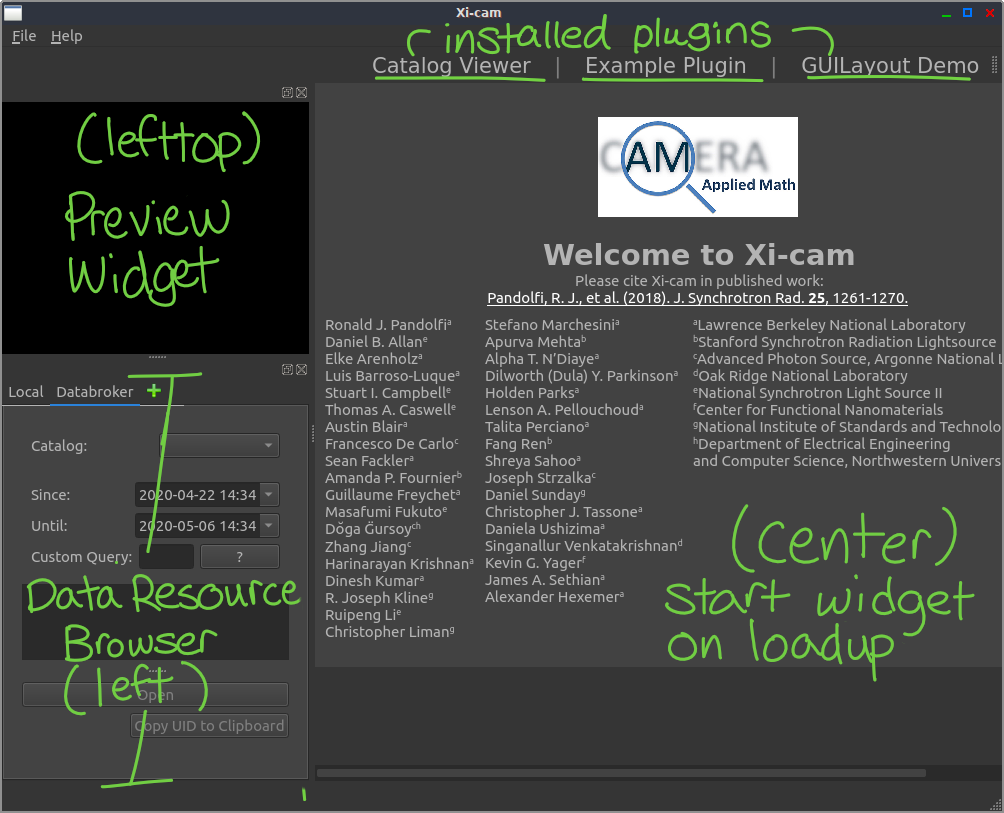
Main window of Xi-CAM when running xicam. Note that there are three installed GUIPlugins here; if you haven’t installed any plugins, you won’t see any listed.
As you can see, the main window of Xi-CAM after it has finished loading
shows any installed GUIPlugins, a citation / references widget, a preview widget,
and a data browser widget.
The data browser widget can be used to load data into a GUIPlugin.
The data preview widget can be used to “preview” data before loading it.
It is important to keep in mind a few concepts for GUIPlugins:
A
GUIPlugincan have one or morestages.Each
stageis defined with aGUILayout.A
GUILayoutis defined with a widget (or multiple widgets).
These concepts are explored in more detail later in this document.
How Do I Create a GUIPlugin?
To create a GUIPlugin, you will need:
a derived class of
GUIPlugina
setup.pyfile with axicam.plugins.GUIPluginentry point
Although you may structure your plugin’s code and support files as you like,
we recommend using a cookiecutter template that we have created for Xi-CAM’s GUIPlugin.
What is cookiecutter?
cookiecutter is a templating tool that can be used to interactively create python project.
For more information, see the cookiecutter documentation.
Install cookiecutter
In your active environment, you will need to pip install cookiecutter.
Run cookiecutter with the Xi-CAM GUIPlugin Template
Now, in the directory of your choice (the home directory, ~, should work if you are unsure),
run the following:
cookiecutter https://github.com/Xi-CAM/Xi-cam.templates.GuiPlugin
This will download the template for creating a GUIPlugin,
then present you with a series of prompts.
A prompt will look like prompt [default value]: .
If you want to use the default value specified, hit the enter key.
Otherwise, respond to the prompt with the value you would like.
Here are the prompts with their descriptions:
| prompt | default value | description |
|---|---|---|
| package_name | my_plugin | name of the package to create (will be xicam.package_name) |
| plugin_name | MyPlugin | name of the GUIPlugin class to create (name of your gui plugin in code) |
| display_name | My Plugin | name of the GUIPlugin as it will appear in the Xi-CAM GUI |
| plugin_version | 1.0.0 | current plugin version number |
| author_name | author's name | |
| author_email | author's email | |
| author_url | url for the author/plugin (e.g. plugin GitHub repo url) | |
| description | description of the plugin | |
| dependencies | packages the plugin depends on | |
| keywords | [Xi-cam, plugin] | keywords to tag the plugin with (when packaging) |
This will create a python package with some files and code to get started developing a GUIPlugin. You can always change the names of your plugin, package, etc. later by hand.
The GUIPlugin you created will be implemented in xicam.package_name/xicam/package_name/__init__.py.
For purposes of this documentation, we will refer to these values by their defaults.
Installing Your GUIPlugin
When you create a new plugin package using cookiecutter,
one of the files it generates is setup.py.
This contains meta-information about the package.
When you run pip install of your package,
it uses this information to create a disribution.
setup.py also defines entry points,
which Xi-CAM uses to find plugins.
For more information about entry points in Xi-CAM, see the following documentation.
Navigate to your created package directory and create an editable pip install:
cd xicam.my_plugin
pip install -e .
This tells pip install your file locally by looking at the setup.py file,
and the -e allows you to make changes to your code without having to reinstall.
If you change an entry point in setup.py, you must reinstall.
Selecting and Activating a GUIPlugin
We can activate any of the installed GUIPlugins by clicking on their name at the top. Let’s click on “My Plugin”:
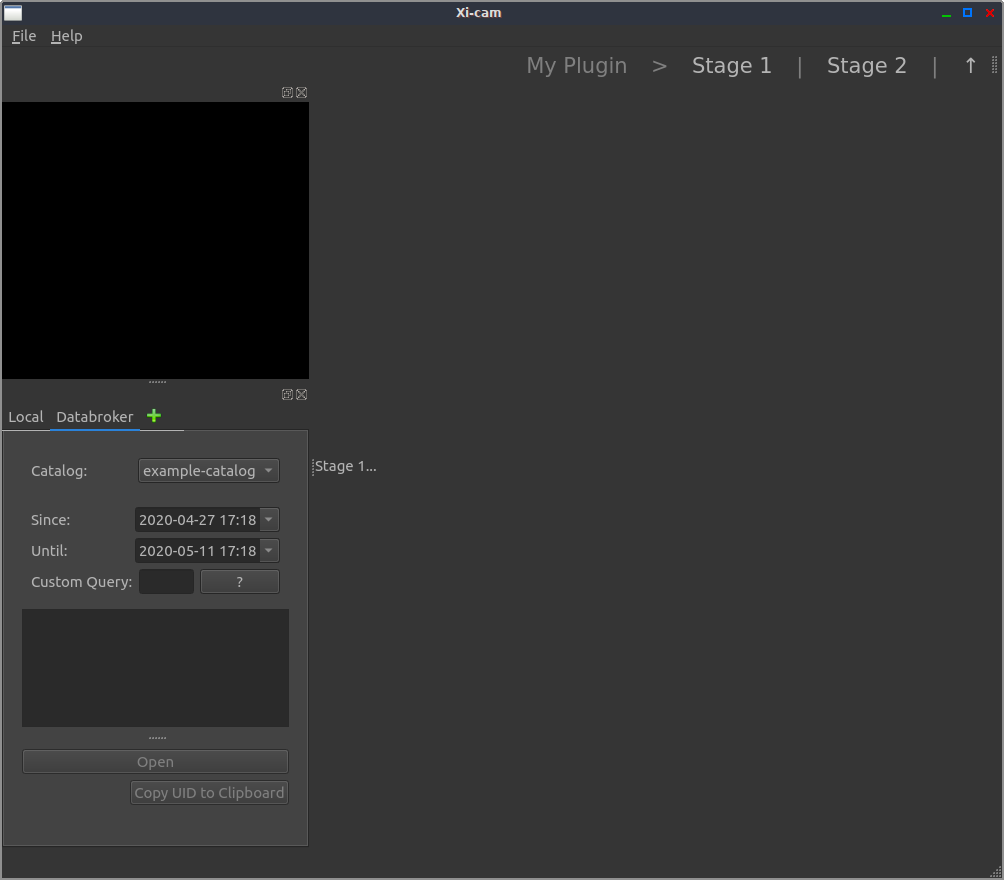
MyPlugin’s interface.
Note that this plugin doesn’t do much yet; it simply displays the text “Stage 1…” You can also click “Stage 2” at the top, and you will see the text “Stage 2…” in the center.
How is MyPlugin Implemented?
The code for MyPlugin is implemented in xicam.package_name/xicam/package_name/__init__.py.
from qtpy.QtWidgets import QLabel

from xicam.plugins import GUIPlugin, GUILayout


class MyPlugin(GUIPlugin):
    # Defines the name of the plugin (how it is displayed in Xi-CAM)
    name = "My Plugin"

    def __init__(self, *args, **kwargs):
        # Insert code here

        # Modify stages here
        self.stages = {'Stage 1': GUILayout(QLabel("Stage 1...")),
                       "Stage 2": GUILayout(QLabel("Stage 2..."))}

        # Initialize the parent class, GUIPlugin
        super(MyPlugin, self).__init__(*args, **kwargs)
Cookiecutter set up this starter code for us.
We have a derived version of GUIPlugin, which we call MyPlugin.
It has the name “My Plugin”, which is how it will appear in the Xi-CAM GUI.
We then have an __init__ method to describe how to create a MyPlugin.
Notice that there is a QLabel, which is simply text, added into two GUILayouts.
These layouts are then added to the interface via self.stages.
What Is a Stage?
Visually, a stage is a stand-alone interface for a GUIPlugin.
A GUIPlugin must have at least one stage but may have multiple stages.
With multiple stages, each stage has its own interface
and each stage can be selected in the top bar of Xi-CAM.
Stages for a GUIPlugin are accessible with self.stages.
self.stages is a dictionary where each
key is the name of the stage
value is a
GUILayouts
For example, we might define two stages as:
self.stages = {"A": GUILayout(QLabel("1")),
               "B": GUILayout(QLabel("2"))}
This will look like:
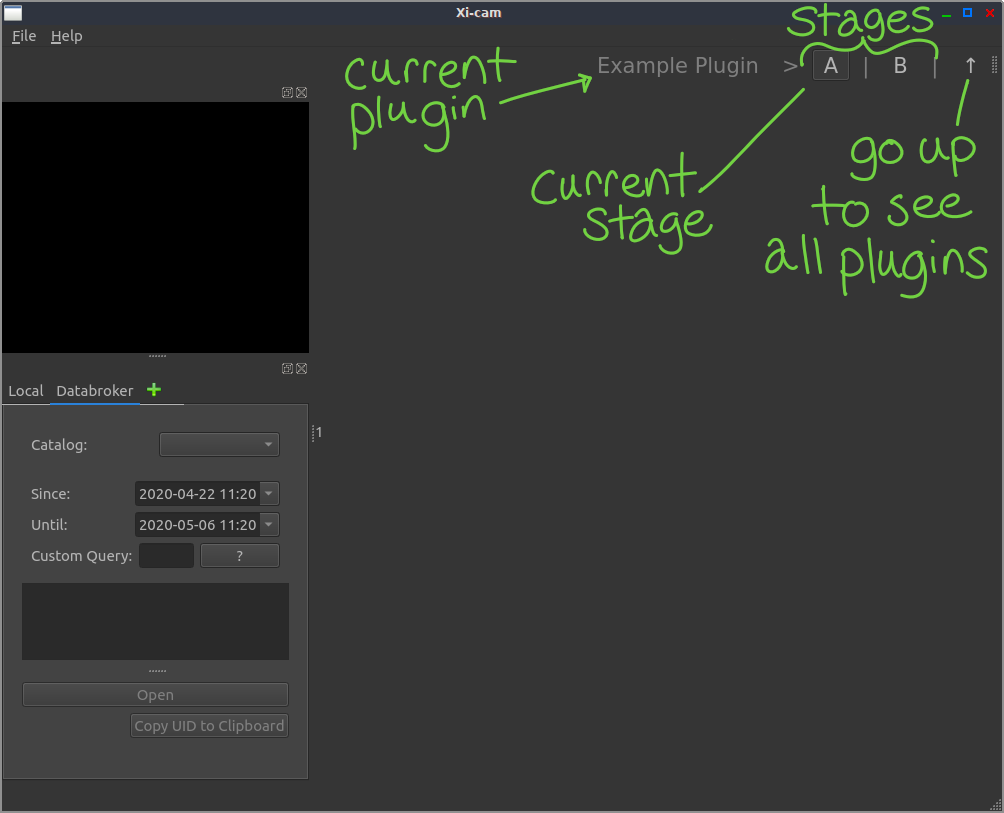
The interface of a plugin named “My Plugin” with multiple stages, “A” and “B”. Note that “A” is currently selected, so we see the label “1” in the middle of the window.
What Is a GUILayout?
A GUILayout is a layout used to describe how widgets should be organized in a stage in a GUIPlugin.
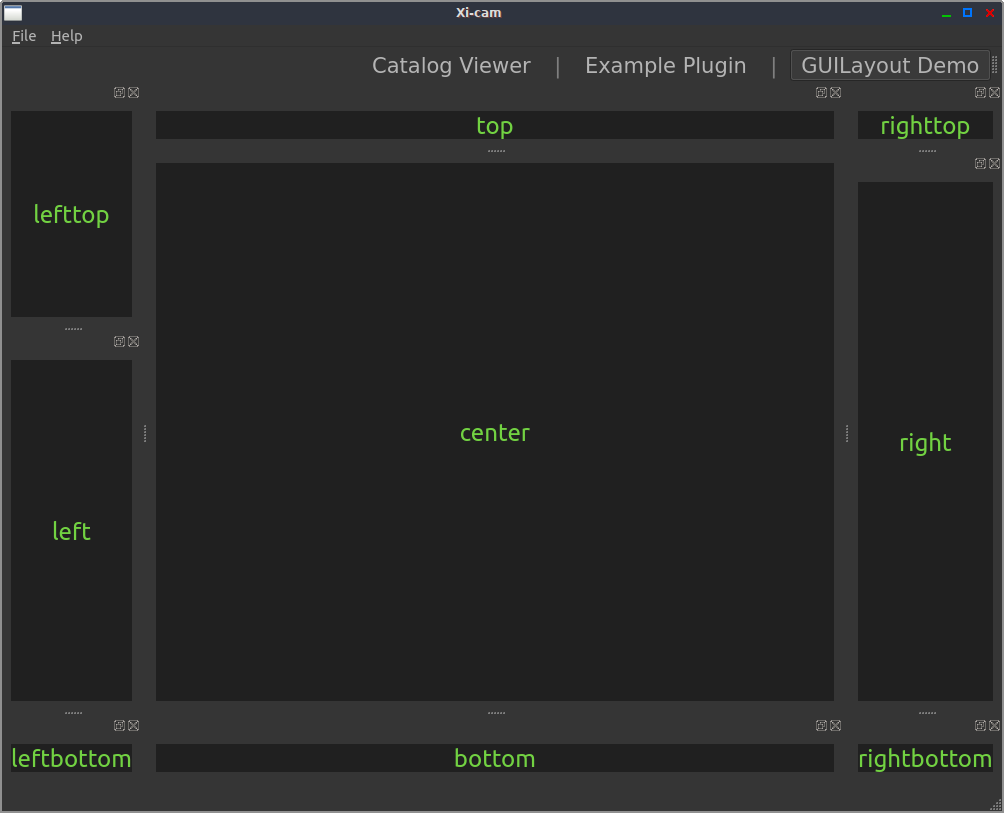
The layout corresponds to a 3x3 grid in the Xi-CAM main window, with the names
center, left, right, lefttop, righttop, leftbottom, rightbottom.
These names correspond to the arguments you can pass when creating a GUILayout.
You must provide at least one widget, which will be the center widget.
What Is a QLabel?
QLabel is a Qt widget provided by the Qt backend Xi-CAM makes use of.
It acts a widget that holds simple text.
For more information on Qt, see Qt for Python Documentation.
How Do I Load Data into My Plugin?
In order to load data into a GUIPlugin, you must:
have access to or configure a databroker catalog
re-implement
appendCatalogin yourGUIPluginderived classthis will need to have access to an internal widget to display the data
have a
GUIPluginselected in Xi-CAM
Configuring a Databroker Catalog
For purposes of this documentation, we will be using a sample msgpack catalog and a starter catalog.yml file you can download.
For general help about databroker, catalogs, and configuration, there is excellent documentation here: https://nsls-ii.github.io/databroker/v2/index.html. Additional documentation about catalogs can be found here: https://intake.readthedocs.io/en/latest/index.html
Download |
MD5 |
|---|---|
3a18341f570b100afbaff1c889e9b4f8 |
|
c14814b4537810f14300f8c8d5949285 |
After downloading these files, we will want to do three things:
Decide where to put our data and move it there
Update our
catalog.ymlpathsto have a path directory the data is inMove our
catalog.ymlto a place it can be discovered
Moving the msgpack Data
You can choose where you’d like to copy or move your data.
For purposes of this guide,
we will create a new directory in our home called catalogs
and move the downloaded msgpack file there.
Updating catalog.yml
Now that we’ve moved / copied our sample catalog msgpack file,
we need to update our catalog.yml to tell it where it can find that data.
We will want to add a line under paths in catalog.yml
that is the complete file path to the catalogs directory we added above.
Making catalog.yml Discoverable
To know where we can put our catalog.yml file,
we can run the following in a Python interpreter:
from databroker import catalog_search_path
print(catalog_search_path())
You can move the catalog.yml file in any of the paths listed.
Note that typically there will be a more user-oriented path
and a more global system-level path for the catalogs to find.
You can copy the catalog.yml file to either (or both) path
depending on how you want a machine set up.
Implementing appendCatalog
Let’s implement the appendCatalog method in MyPlugin
so we can load the catalog.
We will also be adding a widget to view the loaded catalog.
Inside of the MyPlugin class (located in xicam/my_plugin/__init__.py),
add the appendCatalog as follows:
from qtpy.QtWidgets import QLabel

from xicam.core.msg import logMessage
from xicam.plugins import GUILayout, GUIPlugin
from xicam.gui.widgets.imageviewmixins import CatalogView


class MyPlugin(GUIPlugin):
    # Define the name of the plugin (how it is displayed in Xi-CAM)
    name = "My Plugin"

    def __init__(self, *args, **kwargs):
        self._catalog_viewer = CatalogView()
        self._stream = "primary"
        self._field = "img"

        catalog_viewer_layout = GUILayout(self._catalog_viewer)

        # Modify stages here
        # self.stages = {"Stage 1": GUILayout(QLabel("Stage 1..."))}
        self.stages = {"View Catalog": catalog_viewer_layout}

        super(MyPlugin, self).__init__(*args, **kwargs)

    def appendCatalog(self, catalog):
        self._catalog_viewer.setCatalog(catalog, self._stream, self._field)
        logMessage(f"Opening catalog with stream {self._stream} and field {self._field}.")
API Reference
- class xicam.plugins.guiplugin.GUIPlugin
GUIPlugin class for interactive Xi-CAM plugins.
This class represents the fundamental interactive plugin for Xi-CAM.
GUIPlugins are left uninstanciated until all plugins are loaded so that all dependent widgets are loaded before the UI is setup. They DO become singletons.
- appendCatalog(catalog: BlueskyRun, **kwargs)
Re-implement to define how to add a catalog to your GUIPlugin.
- Parameters
catalog (BlueskyRun) – Catalog reference that you can use as you wish (corresponds to the opened catalog in DataResourceBrowser).
- property stages: OrderedDict
Returns the stages of the GUIPlugin.
A stage is defined by a GUILayout; each stage represents a distinct user-interface in a GUIPlugin.
- class xicam.plugins.guiplugin.GUILayout(center, left=PanelState.Defaulted, right=PanelState.Defaulted, bottom=PanelState.Defaulted, top=PanelState.Defaulted, lefttop=PanelState.Defaulted, righttop=PanelState.Defaulted, leftbottom=PanelState.Defaulted, rightbottom=PanelState.Defaulted)
Represents a layout of dockable widgets in a 3x3 grid.
The parameters can either be a PanelState value or a QWidget object. Note that only the center parameter is required; the other parameters default to PanelState.Defaulted. The default behavior of a PanelState.Defaulted widget is to be hidden.
- Parameters
center (Union[QWidget, PanelState]) – The center widget
left (Union[QWidget, PanelState], optional) – The left widget
right (Union[QWidget, PanelState], optional) – The right widget
bottom (Union[QWidget, PanelState], optional) – The bottom widget
top (Union[QWidget, PanelState], optional) – The top widget
lefttop (Union[QWidget, PanelState], optional) – The top-left widget
righttop (Union[QWidget, PanelState], optional) – The top-right widget
leftbottom (Union[QWidget, PanelState], optional) – The bottom-left widget
rightbottom (Union[QWidget, PanelState], optional) – The bottom-right widget
Notes
For an example of how this class can be used, see the xicam.gui XicamMainWindow class.